Houston, We Have Lift Off
Boo-ya-kasha!
Me finally got me sourdough made an it's wicked! And I owe it all to Ali G.
No, really, that's a lie. Honestly, and this is totally unscientific, but I believe I got a nice rise (yeah, baby!) because I made the bread on a day that it didn't rain. Remember my last unsuccessful attempt? Well, it rained then, and remember how I told you that's why it didn't work?
Well, this time my bread rose significantly better, even though it's the same starter. I began the day before by taking my starter out of the fridge and mixing in a cup of flour and a cup of water every 8 hours. On Saturday morning, I again added flour and water to get the starter really crankin'. That was around 7:45 AM. Around 1:45 – 2 PM, I made the first proof.
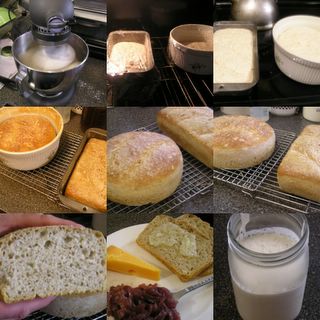
For the first proof, I measured 4 cups of flour (3 white, 1 whole wheat), 2 cups of starter, 2 teaspoons of salt, and about 2 cups of water into my Kitchen-Aid standing mixer. The rest of the starter I put into a clean jar and placed back in the refrigerator. In the mixer, I mixed the ingredients on medium-low until a good looking dough formed. Actually, I didn't add all of the water at once, but mixed in a cup first, then a little more as I saw the dough coming together. My goal was to have a wet, but consistent dough. A wet dough gives you large holes in the crumb that so many people, such as myself, like. Unfortunately, for the dough to be wet enough, it's virtually impossible to knead by hand, which is why the Kitchen-Aid was the only solution for this dilemma. So, after using the Kitchen-Aid to mix, I then used it to knead, keeping it on medium, to medium low, to medium high, back down to medium low, etc., while occasionally stopping and pushing the dough off the hook and starting over again. I did this for approximately 5 minutes.
After I was done kneading, I removed the dough from the hook and kept it in the mixing bowl of the Kitchen-Aid, covered it with plastic wrap, and placed it in the oven that was cold except for the heat of the oven light. There it sat for about 3 hours, or until it had doubled in size.
When I noticed it had doubled, I then had another dilemma. The first time I attempted to make sourdough, my shaped loaf was so wet it just flattened out like a possum on I-5. The second time, I made the dough a little stiffer so that it could hold it's shape, but because it didn't rise, it came out like a sour doorstop. This time, I didn't want to take any chances. I had heard of sourdough bread bakers using molds to bake their bread in. In Egypt, they use these things that look like big flowerpots. And actually, if I had thought of it soon enough, I would've gone out and bought a clean terra cotta pot. I've seen Acme use molds to make their circular loaves, so maybe I was on to something. Once I made my decision, I had to think; what did I have that was similar? The best I could come up with was a souffle dish and a loaf pan. At least I was going to get variety, shapewise. I prepared the vessels by spraying them lightly with Pam (oh, come on, it's just pressurized vegetable oil), and then dusting with flour, making sure to shake out the excess.
Next, I took the risen dough and not really punched, but gently pushed down with the help of a rubber spatula; pushing down the dough that was sticking to the sides of the bowl. It wasn't like punching down dough that had risen using baker's yeast. You know how when you punch down dough that 's been leavened with baker's yeast, it punches down easily and it releases all of this gas and makes a little silent-but-deadly farting noise? Well, this wasn't like that. It was leavened, but it was slightly resistant to punching down. In fact, it was stubborn, like an old goldminer named Gabby, and didn't they use to call goldminers from Northern California "sourdoughs"?
Next, I skillfully (yeah, right) transferred the dough to the "molds". How I did this I will never know or be able to described but let's just say the odds were in my favor that day. All I can say is that I probably could've gotten more dough into the soufflee dish, but I was lucky just to come away from the whole affair with only a little dough stuck to my hands and no real disasters. Once these were set, I covered them with plastic wrap and stuck them back in the "proofing box", aka the cold oven with the oven light on. In hindsight, the plastic probably wasn't a great idea, but it did work up until a point. The negative of using it was that when the dough rose to the point it touched the plastic, it stuck to it, which can tear up your loaf when you attempt to remove it. Fortunately, I caught it in time so that it didn't ruin my loaves. Instead, I boiled some hot water and poured it into a wide-mouthed bowl, which I placed inside of the proofing box with the loaves to keep the humidity high. Why go to all of this trouble, you say? Well, if the surface area of the loaves dry up, they'll form a crust and the bread won't rise to it's potential, you know, like the glass ceiling for women in the workplace. To remedy this, we have to keep the loaves moist and smash sexism in all of its ugly guises.

Farm Woman! Your work in the fields strengthens the spirits of those who are fighting.
Now it was time for the bread to rise the second time, which was about another 3 or 4 hours. When it was ready to bake, I set the oven rack to the medium position and placed terra cotta tiles on it; our version of a gerry-rigged baking stone. The baking stone helps regulate and evenly distribute the heat of the oven. On the rack below it, I placed a full ramkin of water. Then I set the oven for 500 degrees. When the oven temperature was ready, I placed the loaves in and generously sprayed the oven walls with water using a squirt bottle. I then lowered the heat to 425 and sprayed the oven walls every 5 minutes twice afterwards. After 35 minutes, I took the loaves from the oven. Yes! They looked great! The tops were not dark, but they had a happy, brown color to them.
At this point, my stress level rose a bit, since it was now time to take the loaves out of the molds. They popped out of the vessels easily enough, and were slightly heavy. This worried me a little. You can't cut into the loaves immediately, as they have to rest for at least an hour or two. This is because the outside of the bread is hot and dry, while the inside is cooler and moist. When the bread is taken from the oven and begins to cool, the temperture and the moisture are redistributed throughout the loaf and it sets, or evens itself out. After about 45 minutes, I decided to cut into one, saying to hell with it. It was 11:15 PM and I couldn't wait any longer.
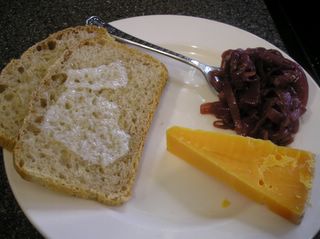
SF Sourdough, Red Onion Preserve, Mimolette cheese
When I saw those holes and the fluffy open texture of the bread, (yeah!) I knew Houston we had lift off. Yes! After 2 unsuccessful attempts (both of which took up full days), lucky number three had come through for me. While the bread is not as sour as it could be, or it's not as open and fluffy, it's still a great bread and smells great. And what's more, I didn't have a set list of instructions and did it mostly through knowledge I gathered from different sources. My next goal, or goals, is to improve on the flavor and the crumb. I'm also eager to get a really good crust and to be able to distribute the rising/baking process over two days, instead of it lasting from the moment I wake up to the moment I go to bed.
At least it's a start.
San Francisco, wild yeast/bacteria-captured, sourdough bread; IN YOUR FACE! Hoo-yeah!
k.
Me finally got me sourdough made an it's wicked! And I owe it all to Ali G.
No, really, that's a lie. Honestly, and this is totally unscientific, but I believe I got a nice rise (yeah, baby!) because I made the bread on a day that it didn't rain. Remember my last unsuccessful attempt? Well, it rained then, and remember how I told you that's why it didn't work?
Well, this time my bread rose significantly better, even though it's the same starter. I began the day before by taking my starter out of the fridge and mixing in a cup of flour and a cup of water every 8 hours. On Saturday morning, I again added flour and water to get the starter really crankin'. That was around 7:45 AM. Around 1:45 – 2 PM, I made the first proof.
For the first proof, I measured 4 cups of flour (3 white, 1 whole wheat), 2 cups of starter, 2 teaspoons of salt, and about 2 cups of water into my Kitchen-Aid standing mixer. The rest of the starter I put into a clean jar and placed back in the refrigerator. In the mixer, I mixed the ingredients on medium-low until a good looking dough formed. Actually, I didn't add all of the water at once, but mixed in a cup first, then a little more as I saw the dough coming together. My goal was to have a wet, but consistent dough. A wet dough gives you large holes in the crumb that so many people, such as myself, like. Unfortunately, for the dough to be wet enough, it's virtually impossible to knead by hand, which is why the Kitchen-Aid was the only solution for this dilemma. So, after using the Kitchen-Aid to mix, I then used it to knead, keeping it on medium, to medium low, to medium high, back down to medium low, etc., while occasionally stopping and pushing the dough off the hook and starting over again. I did this for approximately 5 minutes.
After I was done kneading, I removed the dough from the hook and kept it in the mixing bowl of the Kitchen-Aid, covered it with plastic wrap, and placed it in the oven that was cold except for the heat of the oven light. There it sat for about 3 hours, or until it had doubled in size.
When I noticed it had doubled, I then had another dilemma. The first time I attempted to make sourdough, my shaped loaf was so wet it just flattened out like a possum on I-5. The second time, I made the dough a little stiffer so that it could hold it's shape, but because it didn't rise, it came out like a sour doorstop. This time, I didn't want to take any chances. I had heard of sourdough bread bakers using molds to bake their bread in. In Egypt, they use these things that look like big flowerpots. And actually, if I had thought of it soon enough, I would've gone out and bought a clean terra cotta pot. I've seen Acme use molds to make their circular loaves, so maybe I was on to something. Once I made my decision, I had to think; what did I have that was similar? The best I could come up with was a souffle dish and a loaf pan. At least I was going to get variety, shapewise. I prepared the vessels by spraying them lightly with Pam (oh, come on, it's just pressurized vegetable oil), and then dusting with flour, making sure to shake out the excess.

Next, I took the risen dough and not really punched, but gently pushed down with the help of a rubber spatula; pushing down the dough that was sticking to the sides of the bowl. It wasn't like punching down dough that had risen using baker's yeast. You know how when you punch down dough that 's been leavened with baker's yeast, it punches down easily and it releases all of this gas and makes a little silent-but-deadly farting noise? Well, this wasn't like that. It was leavened, but it was slightly resistant to punching down. In fact, it was stubborn, like an old goldminer named Gabby, and didn't they use to call goldminers from Northern California "sourdoughs"?
Next, I skillfully (yeah, right) transferred the dough to the "molds". How I did this I will never know or be able to described but let's just say the odds were in my favor that day. All I can say is that I probably could've gotten more dough into the soufflee dish, but I was lucky just to come away from the whole affair with only a little dough stuck to my hands and no real disasters. Once these were set, I covered them with plastic wrap and stuck them back in the "proofing box", aka the cold oven with the oven light on. In hindsight, the plastic probably wasn't a great idea, but it did work up until a point. The negative of using it was that when the dough rose to the point it touched the plastic, it stuck to it, which can tear up your loaf when you attempt to remove it. Fortunately, I caught it in time so that it didn't ruin my loaves. Instead, I boiled some hot water and poured it into a wide-mouthed bowl, which I placed inside of the proofing box with the loaves to keep the humidity high. Why go to all of this trouble, you say? Well, if the surface area of the loaves dry up, they'll form a crust and the bread won't rise to it's potential, you know, like the glass ceiling for women in the workplace. To remedy this, we have to keep the loaves moist and smash sexism in all of its ugly guises.

Farm Woman! Your work in the fields strengthens the spirits of those who are fighting.
Now it was time for the bread to rise the second time, which was about another 3 or 4 hours. When it was ready to bake, I set the oven rack to the medium position and placed terra cotta tiles on it; our version of a gerry-rigged baking stone. The baking stone helps regulate and evenly distribute the heat of the oven. On the rack below it, I placed a full ramkin of water. Then I set the oven for 500 degrees. When the oven temperature was ready, I placed the loaves in and generously sprayed the oven walls with water using a squirt bottle. I then lowered the heat to 425 and sprayed the oven walls every 5 minutes twice afterwards. After 35 minutes, I took the loaves from the oven. Yes! They looked great! The tops were not dark, but they had a happy, brown color to them.
At this point, my stress level rose a bit, since it was now time to take the loaves out of the molds. They popped out of the vessels easily enough, and were slightly heavy. This worried me a little. You can't cut into the loaves immediately, as they have to rest for at least an hour or two. This is because the outside of the bread is hot and dry, while the inside is cooler and moist. When the bread is taken from the oven and begins to cool, the temperture and the moisture are redistributed throughout the loaf and it sets, or evens itself out. After about 45 minutes, I decided to cut into one, saying to hell with it. It was 11:15 PM and I couldn't wait any longer.

SF Sourdough, Red Onion Preserve, Mimolette cheese
When I saw those holes and the fluffy open texture of the bread, (yeah!) I knew Houston we had lift off. Yes! After 2 unsuccessful attempts (both of which took up full days), lucky number three had come through for me. While the bread is not as sour as it could be, or it's not as open and fluffy, it's still a great bread and smells great. And what's more, I didn't have a set list of instructions and did it mostly through knowledge I gathered from different sources. My next goal, or goals, is to improve on the flavor and the crumb. I'm also eager to get a really good crust and to be able to distribute the rising/baking process over two days, instead of it lasting from the moment I wake up to the moment I go to bed.
At least it's a start.
San Francisco, wild yeast/bacteria-captured, sourdough bread; IN YOUR FACE! Hoo-yeah!
k.
posted by Dive at 12:19 PM
![]()
![]()
 Hello and welcome. This food blog is based in San Francisco and I'm Kevin, the guy who writes it.
You may know me from my brief, but violent and cracked out, appearance on COPS. Actually, that wasn't me - he didn't even look like me.
I'm more than happy to entertain you, but please don't be so shy. You can comment below or contact me personally at baconprss at yahoo dot com. Oh, and I like to eat sometimes.
Hello and welcome. This food blog is based in San Francisco and I'm Kevin, the guy who writes it.
You may know me from my brief, but violent and cracked out, appearance on COPS. Actually, that wasn't me - he didn't even look like me.
I'm more than happy to entertain you, but please don't be so shy. You can comment below or contact me personally at baconprss at yahoo dot com. Oh, and I like to eat sometimes.

2 Comments:
I have a couple of bread making pointers.
First, yeast (no matter the species) LOVES to eat sugar, it multiplies faster, and makes those little suckers gassy as a lactose intolerant Labrador at a cheese festival. I know it's counter-intuitive to put sugar in a bread you want to be as sour as possible, but a teaspoon in the starter won't sweeten the bread noticably.
One way of making the bread more sour tasting is to add a little vinegar. I would use either white wine or apple cider vinegar because they still have a pretty high sugar content. You can also take the starter out of the fridge two or three days ahead of time and just feed it every day.
You can make a pretty good proofing box out of one of those plastic storage bins, and then either just turn it upside down over your rising bread and hot water in a warm place on the counter, or go ahead and put it in the oven with plastic wrap over the top. Also, you can use plastic wrap over rising loaves, you just have to spray it with Pam.
You said you wanted to work on the crust. I assume you want the characteristic hard, crunchy crust sourdough bread is commonly known for. Instead of just a ramekin of water under the baking loaves, place a 9x13 pan of water directly on the oven floor. You've got a good start with the terracota tiles and the spray bottle, though. Don't be afraid to spray into the oven every ten minutes or so while the bread bakes. The higher the humidity, the crunchier the crust will be. Acme, and places like that, have steam injection ovens.
I hope you find these suggestions helpful, and not pesty.
Thanks Cali,
Those are great suggestions!
k.
Post a Comment
<< Home