Extending An Olive Branch
Where, oh where, have the flowers gone? Long time passing?
Yes, flower children, Fall has fallen upon us and that could mean one of four things:
A. Decent weather until October 15th
B. Bring The Troops Home rally and march on 9/24
C. Olive pickin' time and
D. We're still stuck in this goddamn Age of Pisces.

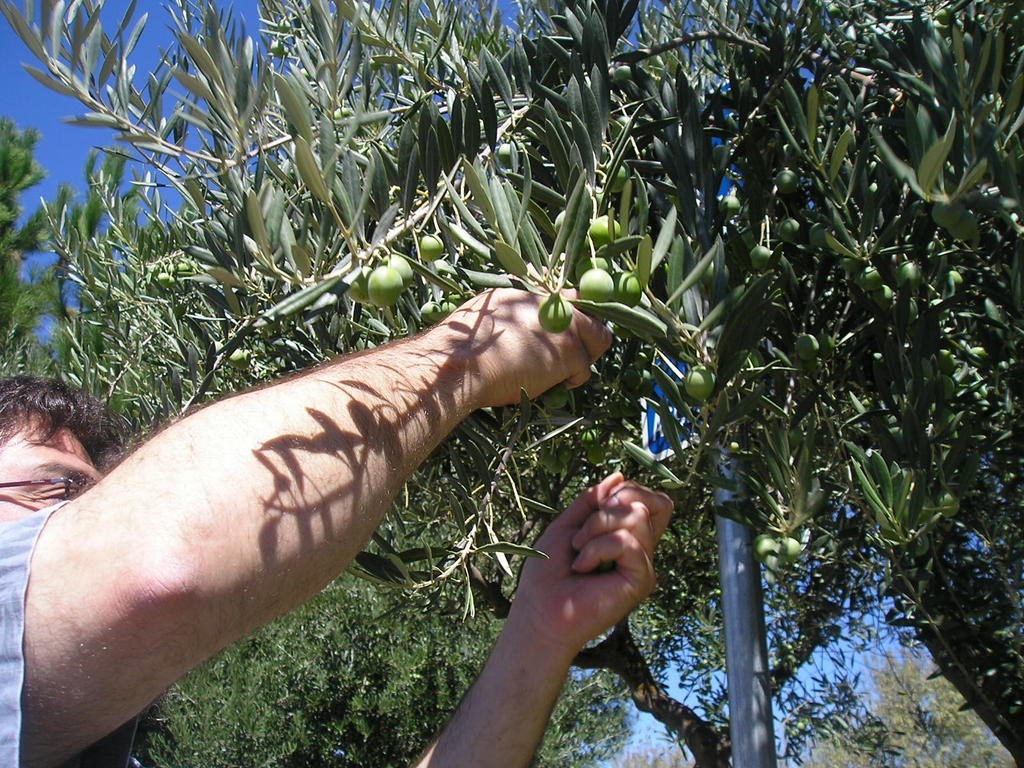
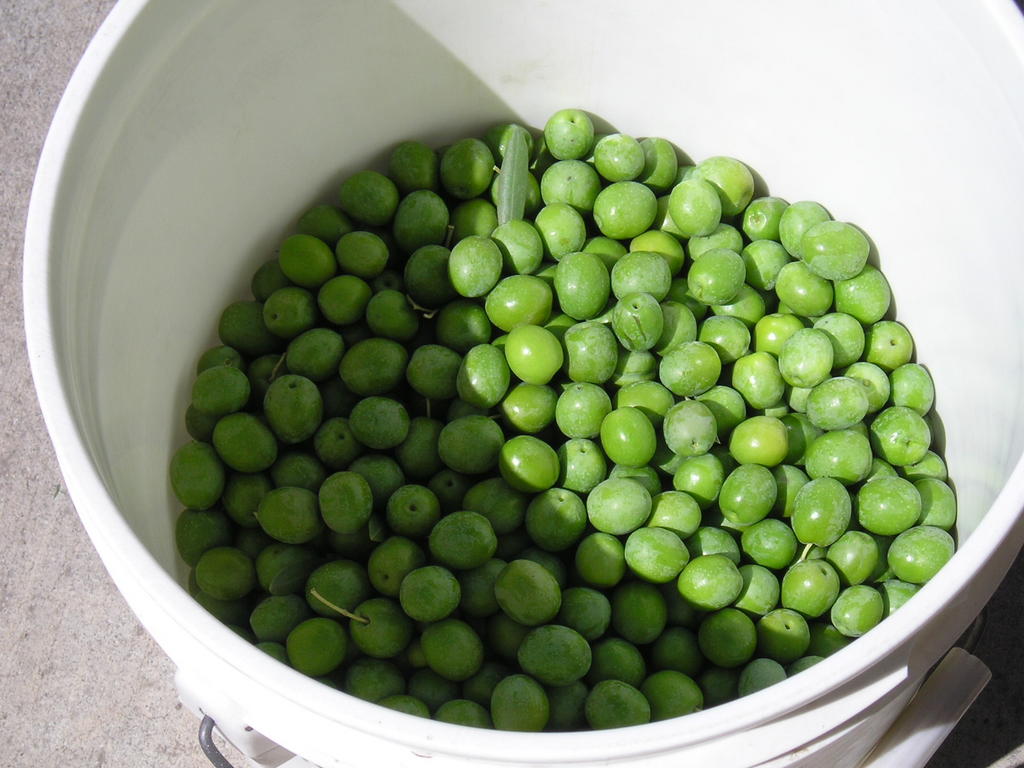
A couple of weeks ago when Bruce and I were in the Central Valley, we stopped by our spot to check out the progress of the olive trees. The olives, while not as big as I've seen before, were of good size and still green. Best of all, they seemed completely free of Olive Fly.
So, after recruiting our unpaid labor force (Karen, Jennifer, and Lori), we headed to our little olive oasis in the middle of the boonies and began picking. In a matter of minutes, we had half of a paint bucket full. Or in terms of pounds, we had approximately 13.5 pounds.
Not bad. I'm beginning to understand why employers appreciate the value of not paying their workers.
 Bruce's dad has been curing his own green olives for a long time and only recently shared with us his recipe and picking location. Last year we picked kind of late in the season and many of the olives had Olive Fly damage. Nevertheless, we cured green, black, and (attempted) green/purple olives; our favorite from that bunch being the salt-cured black olives.
Now that we've had a year to learn, this year we hope to improve our curing techniques and produce quality olives to share with our friends and family.
So far, so good.
Here's my technique for green olives obtained from many different sources (such as Bruce's Dad), as well as trial and error from last year.
Besides olives and water, you'll need:
A long-handled wooden spoon
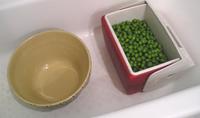
A large non-metallic, non-porous bowl (or something similar, ie., paint bucket)
(This will be used to store your olives in while they cure. For the purpose of this post, I will refer to this as the Hot Diggety Dog, or HDD, container)
Another large, similar container (could be an ice chest. I shall refer to this container as the Red-Headed Stepchild, or RHS, container. This is used to transfer the olives to when changing the water)
A plastic colander (plenty of cheap ones in Chinatown) – or you can use the basket of your salad spinner like I do.
Plenty of Kosher salt
 A gallon size jar or container (I will refer to this as Aunt Melba)
A glass or plastic measuring cup
Rubber Gloves
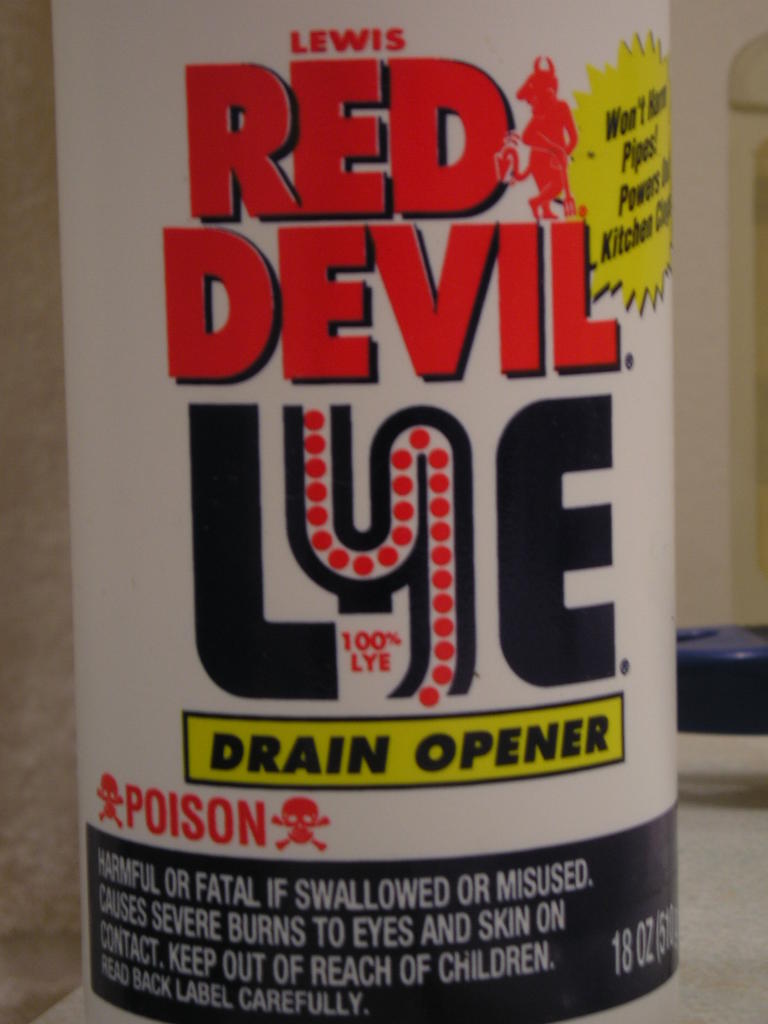
"Red Devil" lye (no additives, only 100% pure. Is found in the cleaning section of your supermarket)
Vinegar
Towels
Prepare a solution of 1 cup vinegar and 1 cup water in a bowl. Keep it nearby to wash your skin in case of lye burn.
OK, here we go!
Place your HDD in the bathtub, or whatever work space/laboratory you have. Dump all of your olives into the HDD container. Fill up your Aunt Melba; it should be approximately 1 gallon. Now pour this over the olives. Does it completely cover the olives? No? Then fill it up again and pour over the olives until just covering. Make a mental note of how many gallons it takes.
 Like I said, we have 13.5 pounds of olives. It took 1.5 gallons of water to cover. I found out how many pounds my olives weighed by pouring them into a paper shopping bag and weighing them on my bathroom scale.
Using your hands, wait no. You better start using your wooden spoon just to get adjusted. Using your wooden spoon, stir the olives to wash off any dirt or dust. Drain the olives and dump into the RHS.
Put on your gloves. Fill the HDD with clean, COLD! water. How much water? Remember that mental note? Are you even paying attention?
OK, let's say you fill it up with 1.5 gallons of water. For that amount, I used exactly ¼ cup of lye. Pour the lye into the (DRY!) measuring cup. Lye reacts strongly with water, so don't mix the two unless it's in your HDD. Also, once it hits the water, a chemical reaction happens and it heats up the water, so only use cold water. And for GOD'S SAKE, don't come in contact with the lye.
Is you crazy? I said don't mess around with the lye!
Taking that into consideration, carefully pour the lye into the water-filled HDD. Now stir gently to mix. No splashing!
Now, slowly and delicately, pour your olives into the HDD. If you want to take an extra precaution, you can spoon the olives in. Cover the HDD with something like a wooden or plastic cutting board or something similar.
Usually, you would let it sit for 6 hours, stirring halfway, then change the solution with a fresh solution and then repeat.
Oh, but not I!
Instead (this was totally due to my schedule), I let them sit in the first solution for 3 ½ hours. Then I drained the olives (very carefully) in the plastic colander, dumped them into the RHS, repeated the lye solution recipe, dumped the olives back into the HDD, covered, shut the bathroom door (so the kitties wouldn't go in there, get into trouble and die and have me wake up to poisoned dead kitties), and went to bed.
As soon as I got up for work, roughly (very rough) 8 hours later, I put my gloves on, drained the olives, dumped them into the RHS, then back into the empty HDD, and poured cold water over them. Actually I did this last step in the kitchen, which is where the HDD will stay until the olives are cured. If the lye-treatment is successful, it would have penetrated the olive. You will know if the lye has penetrated the olive whereby cutting one open, the flesh from the skin to the pit is yellow-green.
As it happens, this specific lye solution along with this amount of time was perfect for the olives. Last year I over-cured the olives using too strong of a mixture and too long of a sitting time. Doing that causes the olives to lose all of their flavor, as well as make the flesh mushy.
If the lye bath treatment was the first stage, this is the second. There are 3 stages total.
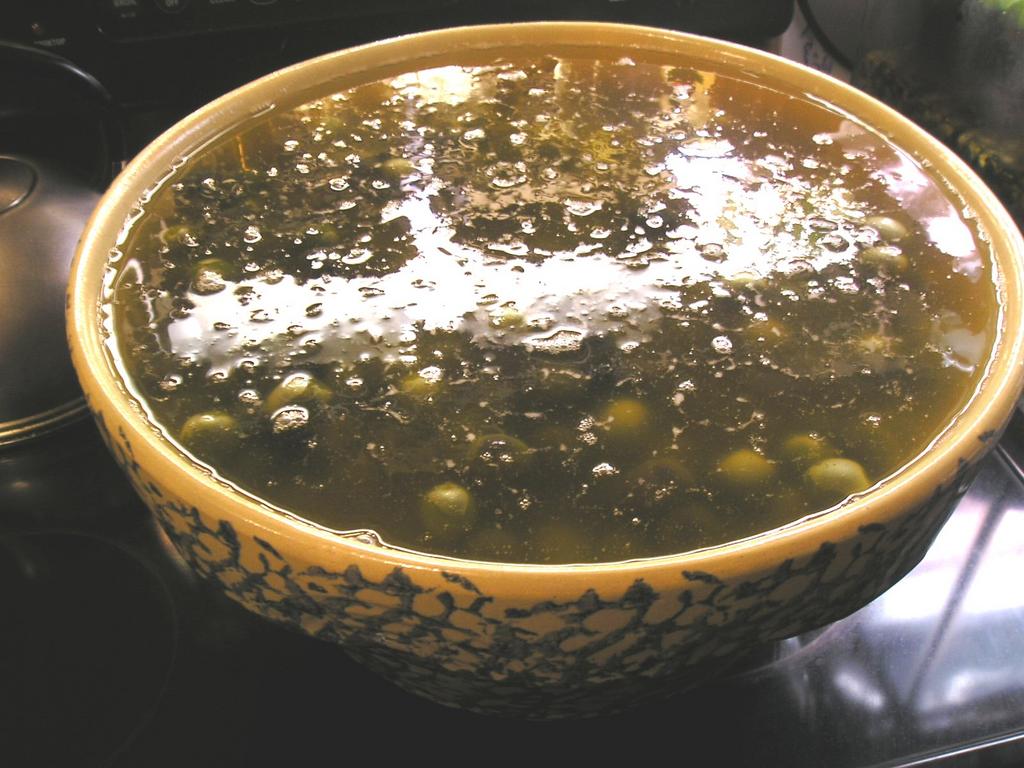
 From now until the next 5 or so days, you are going to be soaking the olives in water, changing the water everyday, keeping it covered. After the 3rd or 4th day, if the olive doesn't feel slick and the water has begun to turn a light pink, you can taste the olive. If it still tastes "soapy", continue to let sit for another 2 days. As it happens, around the 4th day, my olives still needed a day or two. I also noticed that some of the olives didn't have 100% of the bitterness leached out. That's OK. Let them soak another day or two.
OK, that's stage two. Now for stage 3, or the brining/fermenting stage.
Green olives benefit from a brief fermenting stage using nothing but salt and water.
To start, prepare a brine solution using ½ cup table salt for each 1 gallon of water. Stir until salt is dissolved. Pour this solution over the drained olives in the HDD. Stir again and cover. Let sit for 24 hours and then change the water using the same brine solution. Now, for the next 7 days, your job gets easier. All you have to do is stir the olives once a day. Make sure to keep the HDD covered. Also, keep the olives somewhere your kids, or if you're a San Franciscan, your dog, can't get to and in a place that stays consistently at room temperature.
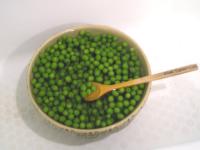
 Around the 7th day, your brine will have that characteristic fonk that all fermented things do. Smell it. Smell the love. Now take an olive out and taste it. Ummm. Tastes good, dunnit. Save that brine!
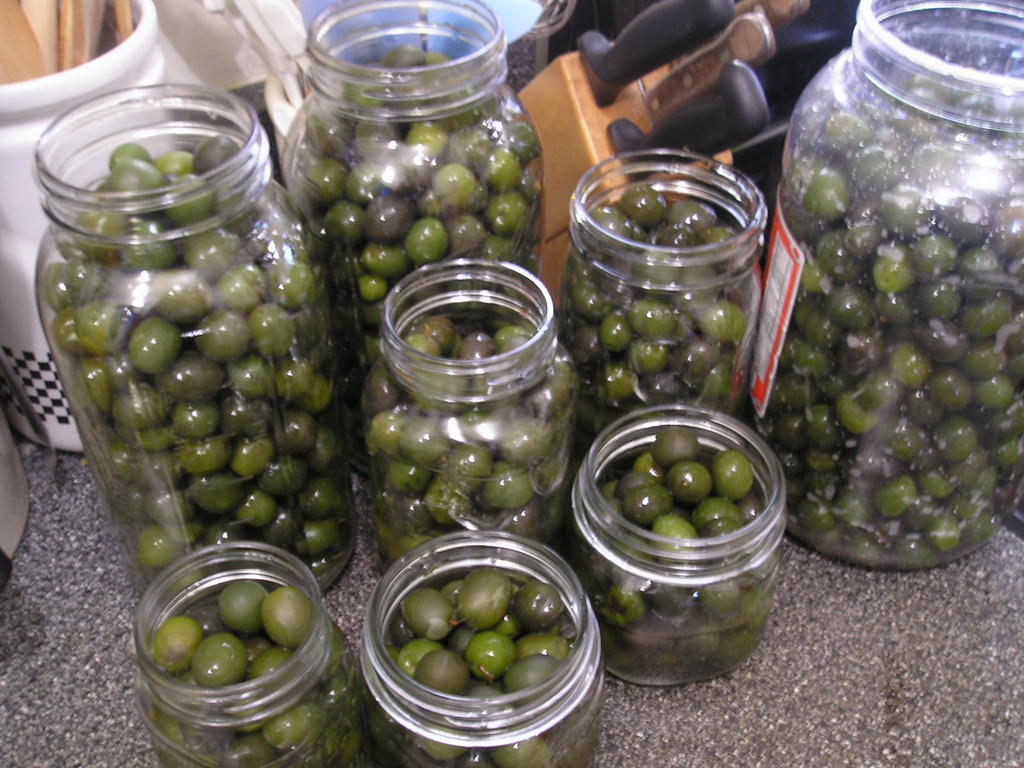
At this point, you should decide if you want to eat the olives right away or store them long term. If you're going to give them away, like at say, Thanksgiving, you should store them in a heavier salt to water ratio; around 2 cups salt per gallon. This solution will allow you to store them in the cupboard. If you want to eat them sooner rather than later, store them in a weaker solution, say 1 cup salt per gallon, and store them in the fridge. When ready to eat, you can decrease the saltiness of the olives by changing the brine the night before to a weaker solution.
 When jarring your olives, put a little bit of the liquid from the mother brine in with your new saline solution. The lactic acid in the brine that is a natural result from the fermenting process is beneficial not only for taste, but for preservation. (Oh, and vegans – some, not all – please google "lactic acid" and learn what it really is. I read some idiots on a vegan chatboard forgoing olives because they contain lactic acid?!)
 I tend to not go overboard in flavoring the olives. They have such a great, buttery flavor on their own, it's almost a shame to cover that up. But if you do, and I do for some of them, you can add a few cloves of chopped garlic, some lemon, and some dried oregano. You can also toss in a chili pepper or two to add heat.

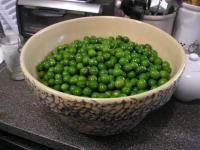
I'm so pleased with this year's olive harvest/cure. The olives I have are firm with a crisp bite to them. The olive meat is rich and almost buttery. They're not over cured and a lot of the olive fruit flavor still remains. The color on the olives are a deep, rich green that is pleasant to the eye.
This is Cali-forn-I-ay living at it's finest, folks.
k.
Yes, flower children, Fall has fallen upon us and that could mean one of four things:
A. Decent weather until October 15th
B. Bring The Troops Home rally and march on 9/24
C. Olive pickin' time and
D. We're still stuck in this goddamn Age of Pisces.
A couple of weeks ago when Bruce and I were in the Central Valley, we stopped by our spot to check out the progress of the olive trees. The olives, while not as big as I've seen before, were of good size and still green. Best of all, they seemed completely free of Olive Fly.
So, after recruiting our unpaid labor force (Karen, Jennifer, and Lori), we headed to our little olive oasis in the middle of the boonies and began picking. In a matter of minutes, we had half of a paint bucket full. Or in terms of pounds, we had approximately 13.5 pounds.
Not bad. I'm beginning to understand why employers appreciate the value of not paying their workers.
 Bruce's dad has been curing his own green olives for a long time and only recently shared with us his recipe and picking location. Last year we picked kind of late in the season and many of the olives had Olive Fly damage. Nevertheless, we cured green, black, and (attempted) green/purple olives; our favorite from that bunch being the salt-cured black olives.
Now that we've had a year to learn, this year we hope to improve our curing techniques and produce quality olives to share with our friends and family.
So far, so good.
Here's my technique for green olives obtained from many different sources (such as Bruce's Dad), as well as trial and error from last year.
Besides olives and water, you'll need:
A long-handled wooden spoon
A large non-metallic, non-porous bowl (or something similar, ie., paint bucket)
(This will be used to store your olives in while they cure. For the purpose of this post, I will refer to this as the Hot Diggety Dog, or HDD, container)
Another large, similar container (could be an ice chest. I shall refer to this container as the Red-Headed Stepchild, or RHS, container. This is used to transfer the olives to when changing the water)
A plastic colander (plenty of cheap ones in Chinatown) – or you can use the basket of your salad spinner like I do.
Plenty of Kosher salt
 A gallon size jar or container (I will refer to this as Aunt Melba)
A glass or plastic measuring cup
Rubber Gloves
"Red Devil" lye (no additives, only 100% pure. Is found in the cleaning section of your supermarket)
Vinegar
Towels
Prepare a solution of 1 cup vinegar and 1 cup water in a bowl. Keep it nearby to wash your skin in case of lye burn.
OK, here we go!
Place your HDD in the bathtub, or whatever work space/laboratory you have. Dump all of your olives into the HDD container. Fill up your Aunt Melba; it should be approximately 1 gallon. Now pour this over the olives. Does it completely cover the olives? No? Then fill it up again and pour over the olives until just covering. Make a mental note of how many gallons it takes.
 Like I said, we have 13.5 pounds of olives. It took 1.5 gallons of water to cover. I found out how many pounds my olives weighed by pouring them into a paper shopping bag and weighing them on my bathroom scale.
Using your hands, wait no. You better start using your wooden spoon just to get adjusted. Using your wooden spoon, stir the olives to wash off any dirt or dust. Drain the olives and dump into the RHS.
Put on your gloves. Fill the HDD with clean, COLD! water. How much water? Remember that mental note? Are you even paying attention?
OK, let's say you fill it up with 1.5 gallons of water. For that amount, I used exactly ¼ cup of lye. Pour the lye into the (DRY!) measuring cup. Lye reacts strongly with water, so don't mix the two unless it's in your HDD. Also, once it hits the water, a chemical reaction happens and it heats up the water, so only use cold water. And for GOD'S SAKE, don't come in contact with the lye.
Is you crazy? I said don't mess around with the lye!
Taking that into consideration, carefully pour the lye into the water-filled HDD. Now stir gently to mix. No splashing!
Now, slowly and delicately, pour your olives into the HDD. If you want to take an extra precaution, you can spoon the olives in. Cover the HDD with something like a wooden or plastic cutting board or something similar.

Usually, you would let it sit for 6 hours, stirring halfway, then change the solution with a fresh solution and then repeat.
Oh, but not I!
Instead (this was totally due to my schedule), I let them sit in the first solution for 3 ½ hours. Then I drained the olives (very carefully) in the plastic colander, dumped them into the RHS, repeated the lye solution recipe, dumped the olives back into the HDD, covered, shut the bathroom door (so the kitties wouldn't go in there, get into trouble and die and have me wake up to poisoned dead kitties), and went to bed.
As soon as I got up for work, roughly (very rough) 8 hours later, I put my gloves on, drained the olives, dumped them into the RHS, then back into the empty HDD, and poured cold water over them. Actually I did this last step in the kitchen, which is where the HDD will stay until the olives are cured. If the lye-treatment is successful, it would have penetrated the olive. You will know if the lye has penetrated the olive whereby cutting one open, the flesh from the skin to the pit is yellow-green.
As it happens, this specific lye solution along with this amount of time was perfect for the olives. Last year I over-cured the olives using too strong of a mixture and too long of a sitting time. Doing that causes the olives to lose all of their flavor, as well as make the flesh mushy.
If the lye bath treatment was the first stage, this is the second. There are 3 stages total.
 From now until the next 5 or so days, you are going to be soaking the olives in water, changing the water everyday, keeping it covered. After the 3rd or 4th day, if the olive doesn't feel slick and the water has begun to turn a light pink, you can taste the olive. If it still tastes "soapy", continue to let sit for another 2 days. As it happens, around the 4th day, my olives still needed a day or two. I also noticed that some of the olives didn't have 100% of the bitterness leached out. That's OK. Let them soak another day or two.
OK, that's stage two. Now for stage 3, or the brining/fermenting stage.
Green olives benefit from a brief fermenting stage using nothing but salt and water.
To start, prepare a brine solution using ½ cup table salt for each 1 gallon of water. Stir until salt is dissolved. Pour this solution over the drained olives in the HDD. Stir again and cover. Let sit for 24 hours and then change the water using the same brine solution. Now, for the next 7 days, your job gets easier. All you have to do is stir the olives once a day. Make sure to keep the HDD covered. Also, keep the olives somewhere your kids, or if you're a San Franciscan, your dog, can't get to and in a place that stays consistently at room temperature.
 Around the 7th day, your brine will have that characteristic fonk that all fermented things do. Smell it. Smell the love. Now take an olive out and taste it. Ummm. Tastes good, dunnit. Save that brine!
At this point, you should decide if you want to eat the olives right away or store them long term. If you're going to give them away, like at say, Thanksgiving, you should store them in a heavier salt to water ratio; around 2 cups salt per gallon. This solution will allow you to store them in the cupboard. If you want to eat them sooner rather than later, store them in a weaker solution, say 1 cup salt per gallon, and store them in the fridge. When ready to eat, you can decrease the saltiness of the olives by changing the brine the night before to a weaker solution.
 When jarring your olives, put a little bit of the liquid from the mother brine in with your new saline solution. The lactic acid in the brine that is a natural result from the fermenting process is beneficial not only for taste, but for preservation. (Oh, and vegans – some, not all – please google "lactic acid" and learn what it really is. I read some idiots on a vegan chatboard forgoing olives because they contain lactic acid?!)
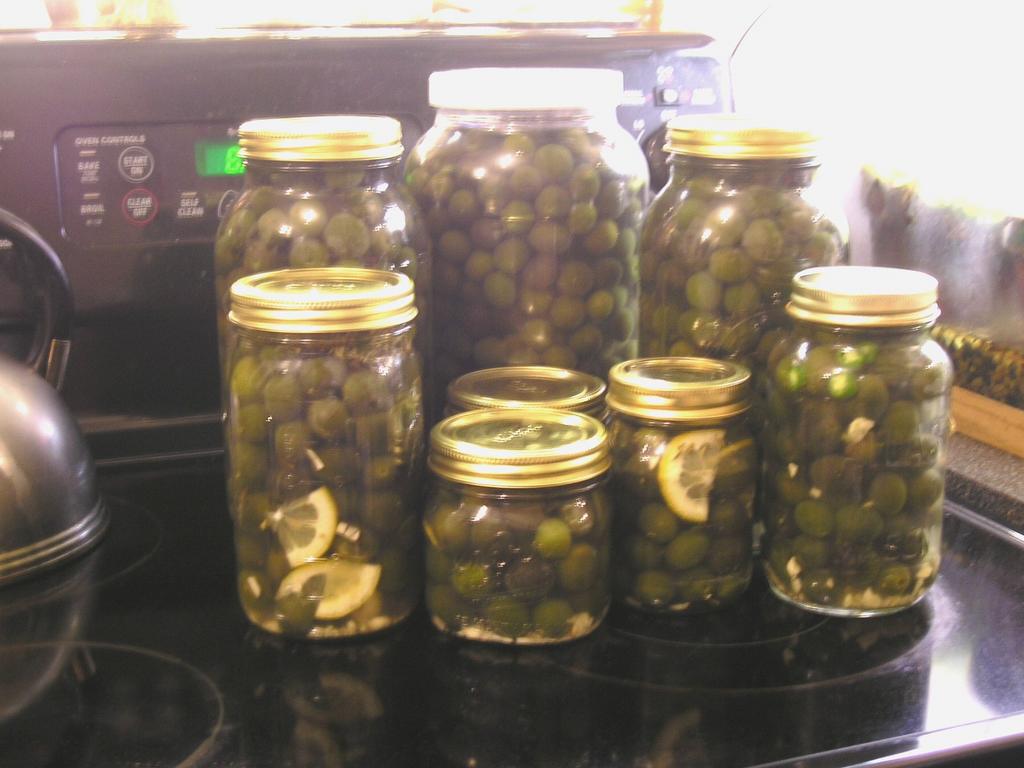 I tend to not go overboard in flavoring the olives. They have such a great, buttery flavor on their own, it's almost a shame to cover that up. But if you do, and I do for some of them, you can add a few cloves of chopped garlic, some lemon, and some dried oregano. You can also toss in a chili pepper or two to add heat.
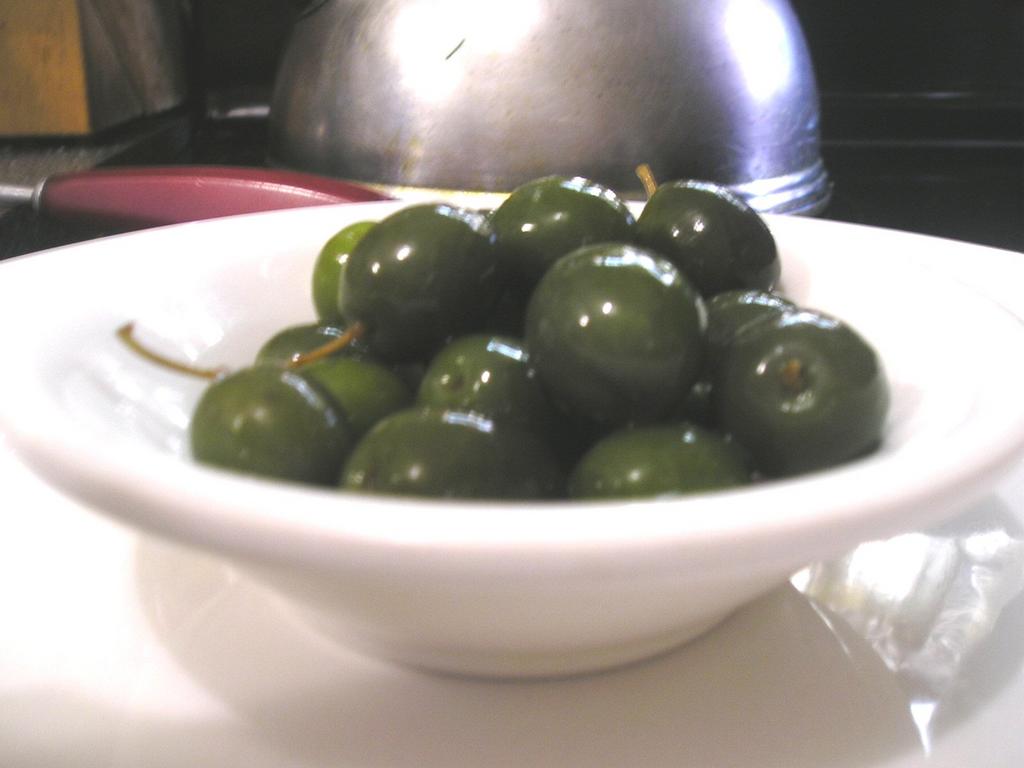
I'm so pleased with this year's olive harvest/cure. The olives I have are firm with a crisp bite to them. The olive meat is rich and almost buttery. They're not over cured and a lot of the olive fruit flavor still remains. The color on the olives are a deep, rich green that is pleasant to the eye.
This is Cali-forn-I-ay living at it's finest, folks.
k.
posted by Dive at 7:52 PM
![]()
![]()
 Hello and welcome. This food blog is based in San Francisco and I'm Kevin, the guy who writes it.
You may know me from my brief, but violent and cracked out, appearance on COPS. Actually, that wasn't me - he didn't even look like me.
I'm more than happy to entertain you, but please don't be so shy. You can comment below or contact me personally at baconprss at yahoo dot com. Oh, and I like to eat sometimes.
Hello and welcome. This food blog is based in San Francisco and I'm Kevin, the guy who writes it.
You may know me from my brief, but violent and cracked out, appearance on COPS. Actually, that wasn't me - he didn't even look like me.
I'm more than happy to entertain you, but please don't be so shy. You can comment below or contact me personally at baconprss at yahoo dot com. Oh, and I like to eat sometimes.

8 Comments:
Hi Bruce and Kevin! Great looking olives! I've never cured them myself, but I really enjoy them. Anyhoo...
I'll be in SF this weekend at the Webzine 2005 conference. (http:www.webzine2005.com) It would be great to meet you. I'll be at the conference both Saturday and Sunday from noon to six. Hope to see you there.
You can click on my name and find my email info there if you can't come to the conference but might still enjoy a breakfast or dinner meeting.
Dang, you're a fnorking badass. I was thinking all along through your read, add the chile pepper, add the chile pepper. And at the last moment, there it was, add the chile pepper.
Time for a martini.
Biggles
Thanks Cali and Dr. B!
If you send me your address (at baconprss at yahoo dot com), I'll send you some (while supplies last obviously!).
:)
k.
Yeah! I did the exact same procedure a few years ago with the olives from my (neighbors) yard. They were good, but I didn't jazz em up enough. And YES, lactic acid is every body's friend. I like the pics too.
Amazing - there are olive trees in the parking lot of our local albertsons and every year I think about trying to get some and cure some. I was originally inspired by an amzing book.
The Golden Gate by Vikram Seth
It is a novel of life in the Bay Area done completely in verse and it is really rally worth reading - not least because right in the middle is a section on picking olives at Stanford U and then curing and brining them in the bathtub!
I hope to take your inspiration and try it myself next year!
Dr. 5,
Sea salt, like Fleur de Sel, would be fine to use if, like,...wait for it...YOU WERE TOTALLY BURSTING WITH CASH!!
Seriously, save it for something truly spectacular, like on top of bruschetta, or something.
Just regular ol' kosher or canning salt will work just fine.
Maybe the folks who told you not to cure with sea salt, in particular Fleur de Sel, is that sea salt has a higher mineral (ie. dirt)/less sodium chloride content than the more refined salts.
k.
You're not going to believe this. On Tuesday, walking to the polling precinct down the street from my house, I passed an olive tree on public property, heavy with unwanted (and quickly ripening) fruit! I'm going there tomorrow with a sack.
Thanks so much for the how-to.
Now, drop by my blog for a scary video of the Presnit.
xx
I grew up with a family that always cured their own olives. I loved the whole process and now cant wait to do it myself. But, the last two times I have picked olives and started soaking them I have found little white worms. Olive fly larvae? How do you tell if the olives have olive flys? The second time I picked I felt like I examined them pretty closely, but there was still a damn maggotty thing. Help!
Post a Comment
<< Home